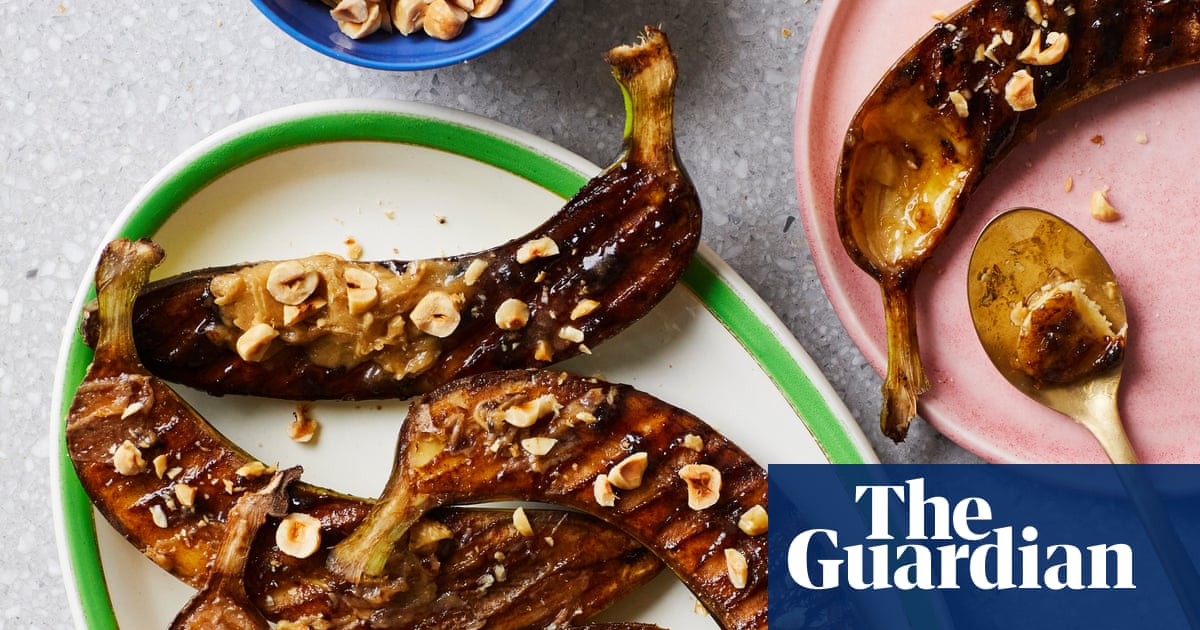
Grilled fruit is the perfect example of a low-effort, high-reward dessert. Just a few minutes on a griddle pan or barbecue, and even the most humble of fruits gets transformed into something sweet and sticky. I’ve gone for bananas here; the flesh develops an addictive caramelised layer that pairs really well with the bourbon butter. Just be sure to use bananas that aren’t too ripe, so they don’t turn to mush.
Grilled bananas with bourbon butter
Prep 5 min
Cook 15 min
Serves 4
80g light brown sugar
1 tsp cinnamon
4bananas
1 small handful chopped hazelnuts
For the bourbon butter 150g salted butter, softened 1 tbsp light brown sugar
1 tbsp bourbon
For the bourbon butter, whip the butter and sugar until smooth, then whisk in the bourbon – add a little more to taste, if you like.
For the bananas, mix the sugar and cinnamon in a small bowl. Cut the bananas in half lengthways and lay them cut side up on a work surface. Top generously with the sugar mixture, pressing it gently into the flesh.
Heat a griddle pan or barbecue, then lay on the bananas sugar side down. Cook for two to three minutes (try not to move them around), then flip over and cook on the skin side for a minute or two. Brush the flesh with some of the bourbon butter, then lift them on to a serving plate.
Serve the bananas in their skins with more bourbon butter spread on the flesh and some roughly chopped hazelnuts scattered over the top.
America may have cinnamon rolls and Sweden its kardemummabullar, but I’m with Jane Grigson when she describes our own Chelsea buns as “the best of all buns on account of their buttery, melting sweetness, and the fun of uncoiling them as you eat”. Named after a renowned 18th-century bakery near Sloane Square in London, these sticky treats are best eaten fresh from the oven, preferably your own.
Prep 10 min
Rise 1-2 hrs
Cook 1 hr
Makes 9
200ml milk
60g butter
450g plain white flour plus extra for dusting
2 tbsp caster sugar
½-1 tsp salt
5g quick yeast
1 egg, lightly beaten Zest of 1 lemon
1 tsp mixed spice
For the filling 30g butter, slightly softened 35g soft brown sugar
100g currants
For the glaze 1 tbsp milk
2 tbsp caster sugar
2 tbsp demerara sugar
1 Melt the butter
Put the milk and butter in a small pan and heat gently to melt the butter, or do this in the microwave, then give it a stir. (If the mixture comes out steaming hot rather than warm, set aside to cool slightly before use, as anything above 55C will kill the yeast, meaning your buns won’t rise.)
2 Make the dough
Meanwhile, put the flour, sugar, salt and yeast in a large bowl and whisk to combine – you could use bread flour instead, if that’s what you have, though plain flour will give a softer crumb. Pour in the warm milk and butter mix (no need to wash the pan/bowl for now) and the beaten egg, and stir until it comes together into a soft dough.
3 Add any flavourings
Mix in the lemon zest (or orange, or indeed any citrus zest, as long as it’s unwaxed or well scrubbed) and spice.
If you don’t have mixed spice, you could use roughly the same amount of ground cinnamon, nutmeg, ginger, mace or cardamom, alone or in combination (but don’t overdo it, as cinnamon can inhibit yeast activity).
4 Knead the dough, then rest
Knead the dough on a clean surface for about 10 minutes, until smooth and elastic. You could use a food mixer fitted with a dough hook for this, in which case it will take about half the time.
Put in a lightly greased bowl, cover and leave in a draught-free place until roughly doubled in size (probably one to two hours).
5 Add the butter and dried fruit
Grease a tin about 27cm square. Turn out the dough on to a lightly floured surface, knock back and roll out to a rectangle about 25cm x 35cm, with one of the long sides facing you.
Smear the butter on top, then scatter evenly with the sugar and currants (you could use any kind of dried fruit, but chop it to currant size if it’s large).
6 Roll, then cut
Lightly press the long side nearest you down on the work surface to anchor it, then take hold of the opposite long side and roll it towards you, keeping the roll as tight as possible.
Use a sharp knife to cut the sausage of dough into nine even pieces, taking care not to squash them as you do so.
7 Prove again …
Arrange the pieces in the greased tin swirl-side up, making sure they’re not too close to each other or the edges of the tin, then cover and leave to prove in a draught-free place until the pieces are touching each other (probably another 30-45 minutes).
Towards the end of this time, heat the oven to 200C (180C fan)/390F/gas 6.
8 … then bake
Bake the buns for 20-30 minutes, until golden brown, keeping an eye on them and covering them loosely with foil if the fruit starts to burn towards the end of the cooking time. After about 15 minutes, warm the remaining tablespoon of milk in the small pan or bowl you used to melt the butter, and stir in the caster sugar to dissolve.
9 Glaze the buns
As soon as the buns come out of the oven, brush them with this sugary glaze, then scatter with the demerara sugar. Leave to cool before tearing apart. The buns are best eaten on the day they’re made, but they do freeze well, either at the end of step 7, frozen in the tin and well wrapped (defrost before baking), or baked.
Summer is in the air, so welcome the season's fresh flavors with these easy dinner recipes. All you need is one pot or pan to whip up these meals, making them simple options for the months to come. Plus, they're packed with anti-inflammatory ingredients like broccoli, dark leafy greens, avocado and fish, so they can help relieve stubborn symptoms like joint stiffness, mental fog and digestive issues. Recipes like our Vegan Coconut Chickpea Curry and Sheet-Pan Chicken Fajitas are healthy and delicious choices for dinner this summer.
One-Pan Garlicky Shrimp & Rice
Caitlin Bensel
This one-pan shrimp and rice recipe makes a great weeknight dinner with easy cleanup. The garlic mellows as it cooks and infuses its flavor into the sweet shrimp and rice in the pan. A squeeze of lemon at the end brightens up the dish.
Sheet-Pan Chicken Fajitas
One sheet pan is all you'll need to whip up this chicken fajita recipe. They're quick and easy to make and cleanup is even faster!
Vegan Coconut Chickpea Curry
To make this 20-minute vegan curry even faster, buy precut veggies from the salad bar at the grocery store. To make it a full, satisfying dinner, serve over cooked brown rice. When shopping for simmer sauce, look for one with 400 mg of sodium or less and check the ingredient list for cream or fish sauce if you want to keep this vegan. If you like a spicy kick, add a few dashes of your favorite hot sauce at the end.
Easy Salmon Cakes
These healthy salmon cakes are a delicious way to boost your intake of omega-3s. It is also a great way to use convenient canned (or leftover) salmon.
One-Pan Roasted Chicken Legs with Citrus & Star Anise
Jacob Fox
Whole chicken legs make a beautiful presentation, but you can opt for drumsticks or chicken thighs—just watch the timing, as they'll be ready a little faster. This recipe only uses one skillet to help you cut down on cleanup. Serve with bok choy and rice to soak up all the delicious sauce.
Chicken & Kale Taco Salad with Jalapeño-Avocado Ranch
This healthy, super-fast salad recipe swaps out romaine for kale, giving you more than 10 times the vitamin C. Easy flavor hacks like store-bought ranch and pickled jalapeños help make a creamy, tangy and spicy dressing you'll want to drizzle on everything from salad to sliced veggies and shredded poached chicken.
One-Pot Pasta with Tuna
Joy Howard
Use the one-pot pasta cooking method to make this tuna pasta recipe that calls for just 5 ingredients and is ready in just over half an hour. For extra crunch and a tuna noodle casserole feel, sprinkle this speedy pasta dish with toasted whole-wheat panko breadcrumbs.
Shirataki Noodles with Chicken, Feta & Tomato
Photographer: Jen Causey, Food Stylist: Emily Nabors Hall
We pair shirataki noodles with feta and tomatoes in this quick and vibrant dinner recipe. The tomatoes release their juices to create a glossy sauce that clings to the noodles and carries with it the flavors of garlic, oregano and basil. Crumbled feta and Kalamata olives add a briny punch.
Sautéed Striped Bass with Lemon and Herb Sauce
Greg Dupree
If you find sea bass to be strong-flavored, remove the pan drippings from the skillet before making the sauce for a milder final product. The wine-butter sauce is a good complement to the dish, especially with caramelized lemon notes.
20-Minute Chicken Cutlets with Creamy Pesto Sauce
Serve these creamy pesto chicken cutlets over your favorite pasta or zucchini noodles. This easy dinner recipe is sure to become a new family favorite.
One-Pot Pasta With Spinach & Tomatoes
Caitlin Bensel
This one-pot pasta dinner is simple, fresh, and healthy—what's not to love? Cooking the pasta right in the sauce saves time and cleanup while infusing the noodles with more flavor. This speedy recipe is also endlessly adaptable, and lends itself to plenty of easy ingredient swaps (make sure to check out the clever riffs below). Change up the spinach for any vegetables you have on hand such as sliced zucchini and mushrooms, or add leftover chicken or cooked and crumbled sausage. We've happily embraced whole-wheat spaghetti as a healthier alternative to white pasta; it works especially well in this one-pot application.
Skillet Chicken with Orzo & Tomatoes
Victor Protasio
In this healthy chicken recipe, chicken thighs are infused with lemon, garlic and herbs and paired with orzo that's perfectly al dente. Charred tomatoes and onions add full flavor to complete this easy, one-skillet dinner.
Greek Salad with Edamame
Edamame adds protein to the classic Greek salad: romaine, tomatoes, cucumber, feta and olives. Serve with toasted pita brushed with olive oil and sprinkled with dried oregano or za'atar.
One-Pot Garlicky Shrimp & Broccoli
Photography: Kelsey Hansen; Food Styling: Greg Luna
Shrimp and broccoli cook quickly in this easy, one-pot recipe, making it perfect for busy weeknights. Serve this healthy shrimp recipe over whole grains or rice.
Cauliflower Fajita Skillet
Jacob Fox
Thinly sliced cauliflower florets mimic the signature shape of fajita meat in this dish. We cook it in a cast-iron skillet for that tableside sizzle you'd get at a restaurant.
Chicken Cutlets with Sun-Dried Tomato Cream Sauce
Though a chicken cutlet may be a chicken breast cut in half, this recipe shows how to make chicken cutlets with double the deliciousness. A jar of sun-dried tomatoes does double duty for this healthy dinner idea. The flavorful oil they're packed in is used to sauté the chicken, and the tomatoes go into the cream sauce.
Pineapple Tofu Stir-Fry
At last--a sweet-and-sour dish with a fresh, not cloying, taste. Add a pinch of crushed red pepper, a splash of chile-garlic sauce or a dash of hot sauce to give it a little heat.
Chicken Club Wraps
Whole-wheat tortillas provide a tasty twist in this quick grilled chicken breast recipe that combines all the elements of a classic club sandwich into a wrap. Serve with extra napkins.
America may have cinnamon rolls and Sweden its kardemummabullar, but I’m with Jane Grigson when she describes our own Chelsea buns as “the best of all buns on account of their buttery, melting sweetness, and the fun of uncoiling them as you eat”. Named after a renowned 18th-century bakery near Sloane Square in London, these sticky treats are best eaten fresh from the oven, preferably your own.
Prep 10 min
Rise 1-2 hrs
Cook 1 hr
Makes 9
200ml milk
60g butter
450g plain white flour plus extra for dusting
2 tbsp caster sugar
½-1 tsp salt
5g quick yeast
1 egg, lightly beaten Zest of 1 lemon
1 tsp mixed spice
For the filling 30g butter, slightly softened 35g soft brown sugar
100g currants
For the glaze 1 tbsp milk
2 tbsp caster sugar
2 tbsp demerara sugar
1 Melt the butter
Put the milk and butter in a small pan and heat gently to melt the butter, or do this in the microwave, then give it a stir. (If the mixture comes out steaming hot rather than warm, set aside to cool slightly before use, as anything above 55C will kill the yeast, meaning your buns won’t rise.)
2 Make the dough
Meanwhile, put the flour, sugar, salt and yeast in a large bowl and whisk to combine – you could use bread flour instead, if that’s what you have, though plain flour will give a softer crumb. Pour in the warm milk and butter mix (no need to wash the pan/bowl for now) and the beaten egg, and stir until it comes together into a soft dough.
3 Add any flavourings
Mix in the lemon zest (or orange, or indeed any citrus zest, as long as it’s unwaxed or well scrubbed) and spice.
If you don’t have mixed spice, you could use roughly the same amount of ground cinnamon, nutmeg, ginger, mace or cardamom, alone or in combination (but don’t overdo it, as cinnamon can inhibit yeast activity).
4 Knead the dough, then rest
Knead the dough on a clean surface for about 10 minutes, until smooth and elastic. You could use a food mixer fitted with a dough hook for this, in which case it will take about half the time.
Put in a lightly greased bowl, cover and leave in a draught-free place until roughly doubled in size (probably one to two hours).
5 Add the butter and dried fruit
Grease a tin about 27cm square. Turn out the dough on to a lightly floured surface, knock back and roll out to a rectangle about 25cm x 35cm, with one of the long sides facing you.
Smear the butter on top, then scatter evenly with the sugar and currants (you could use any kind of dried fruit, but chop it to currant size if it’s large).
6 Roll, then cut
Lightly press the long side nearest you down on the work surface to anchor it, then take hold of the opposite long side and roll it towards you, keeping the roll as tight as possible.
Use a sharp knife to cut the sausage of dough into nine even pieces, taking care not to squash them as you do so.
7 Prove again …
Arrange the pieces in the greased tin swirl-side up, making sure they’re not too close to each other or the edges of the tin, then cover and leave to prove in a draught-free place until the pieces are touching each other (probably another 30-45 minutes).
Towards the end of this time, heat the oven to 200C (180C fan)/390F/gas 6.
8 … then bake
Bake the buns for 20-30 minutes, until golden brown, keeping an eye on them and covering them loosely with foil if the fruit starts to burn towards the end of the cooking time. After about 15 minutes, warm the remaining tablespoon of milk in the small pan or bowl you used to melt the butter, and stir in the caster sugar to dissolve.
9 Glaze the buns
As soon as the buns come out of the oven, brush them with this sugary glaze, then scatter with the demerara sugar. Leave to cool before tearing apart. The buns are best eaten on the day they’re made, but they do freeze well, either at the end of step 7, frozen in the tin and well wrapped (defrost before baking), or baked.
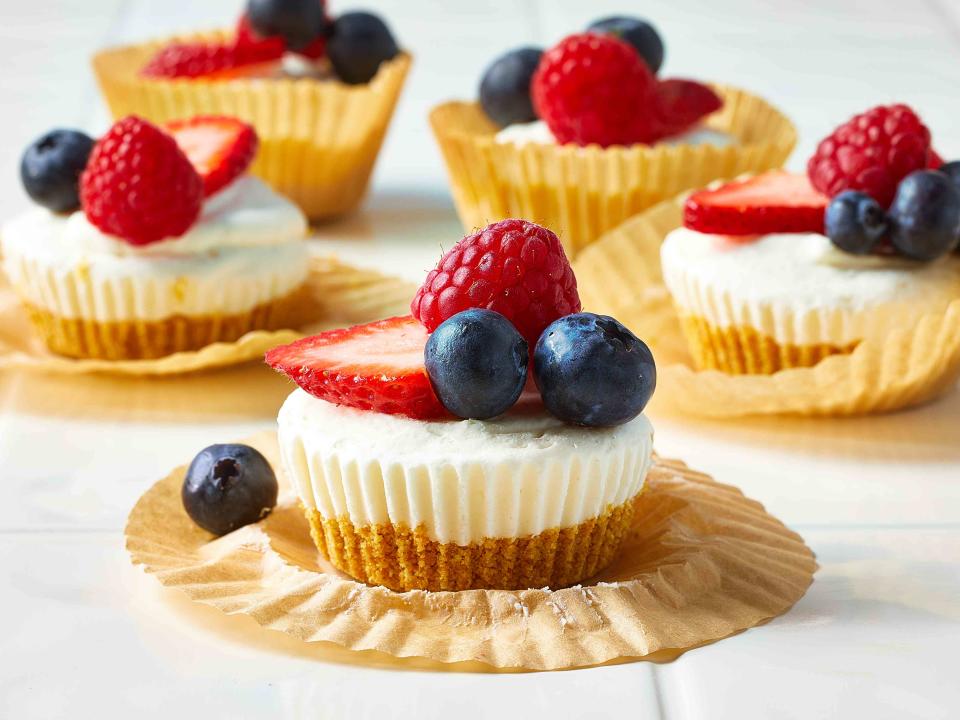
We weren’t surprised when we discovered our most popular recipe last week was a cold, mini-sized dessert recipe. People were preparing for Memorial Day weekend get-togethers where crowd-pleasing desserts are always a must, and these Mini No-Bake Cheesecakes filled that need perfectly.
Keep this simple recipe in your back pocket all summer long any time you’re in need of a simple dessert that doesn’t heat up your kitchen. Grab your mixer, mini muffin tins, decorative liners, and this recipe—and get "no-baking"!
Mini No-Bake Cheesecakes Are Summer-Party Perfect
Why heat up your kitchen in the summer heat if you don’t have to? Keeping your kitchen cool is just one of the reasons this dessert is perfect for summer. But it’s not the only reason no-bake mini cheesecakes are great for summer parties.
If you’ve ever made our Best No-Bake Cherry Cheesecake, you already know how easy it is to make a no-bake cheesecake. These minis are similar, but you won’t need a knife for cutting, a pie server for lifting, or forks for eating. They’re bite-sized and easy to snatch from a pretty serving tray and pop in your mouth—perfect for a summer dessert table.
They’re also simple and quick to make. They have a 30-minute prep time and a three-hour chilling time before they're topped with fruit. The recipe is also very easy to double or triple, depending on how many servings you need.
If you’re looking to make things easier on the day of your party, you can prepare these cheesecakes up to five days ahead of time and keep them stored—without the fruit topping—in an airtight container in the fridge. If you’re someone who likes to prepare well ahead of time for events, they freeze well for up to three months. Just thaw them overnight in the refrigerator the day before serving.
Cheesecake Topping Ideas
Cheesecakes are super versatile when it comes to toppings. The recipe calls for a topping of fresh raspberries, but you can add any fresh berries you want, such as strawberries, blueberries, blackberries, or a combination. Canned fruit pie filling also makes a quick and tasty topping.
If you want to mix it up, top some of the mini cheesecakes with something a little less traditional like chocolate whipped cream, caramel sauce, or cinnamon apple syrup. Don’t forget to leave the topping off a few of the treats for the "cheesecake purists" who want just the cheesecake—and nothing but the cheesecake.
However you choose to top these treats, you’ll be the hero of the summer pool party, barbecue, or picnic when you share these delicious no-bake mini cheesecakes.
Article From & Read More ( Our Most Popular Recipe Last Week Is a No-Bake Dessert We'll Be Making All Summer Long - Yahoo Life )
https://ift.tt/x8AYhUd
Entertainment



:max_bytes(150000):strip_icc()/64227841-47a0471010024608874124edcf4e6f47.jpg)